Wednesday, September 26, 2012

Our house in pictures...

It's fall on the chalkboard wall, y'all!


I figured since I had some down time and my house was clean I should go ahead and take come pictures to keep documenting the process.

Walking in from the mudroom:

Once you step into the kitchen, this is the view you would have:

Living Room:

You will notice in the picture above that our very first piece of wall-art is up! I finally framed the original key to the house:

Kitchen:
Dining Room:


Bedroom with headboard up (holler!). And bed off the ground (double holler!!):

Spare Room:

While I was busy playing house, Lee was working on his own project outside...a drainage grate in front of our garage:


Hard worker, he is :)

ps.  I updated the "pages" that are at the top of my home page.  So if you click on "Living" or "Dining" or "Kitchen" etc, the pictures have been updated so you can see the transformation from start to finish.  

Thursday, July 26, 2012

Headboard

I recently got fixated on making a headboard for our bed.  Now that I have my pretty new curtains I felt the need to keep going with making our bedroom a little more snazzy.  Originally, I was going to use an old door we had at the house, throw some foam and some fabric on it and call it a day.  Thing is, it couldn't just be that easy.  Take a good long look at this picture and tell me if you see the problem (pretend our bed is not sitting on the floor and that it is actually up on a frame like the normal bed it will be very soon):


Do you see the problem?  Let me make that plural, do you see the problems?
Light switches.  They get in the way of any normal, easy headboard.  I had to get funky.  And by funky, I mean so funky that I had to make an old-school rigged up compass with two pencils and yarn in-between in order to complete my project.  I'm not kidding. 

Proof: 

But guess what?  It did the trick!! I went from a solid sheet of OSB:

To this beauty:

The homemade compass worked like a charm to create the shape I needed!  Those swoops on the side will do just the trick for avoiding the light switches but still allowing me a big, beautiful headboard.

I always get a little excited when I need to use a power tool.  I get all "I am woman, hear me roar".  What would be the female version of the grunt that Tim the Tool Man Taylor does?  Someone let me know, I need some kind of fun noise to make whenever I use a power tool. This one below is a jigsaw.


After cutting my shape, I needed foam.  Thing is, 2" foam from the craft store costs a pretty penny.  I got to thinking about other foam I could use and settled in on an egg-crate bed topper from Target - yay for back to school sales!  You know what I'm talking about, right?  This guy for $25.  Which certainly beats the "real" foam from a fabric store which could have cost me upwards of $150.00. 

First, I laid out my foam (egg-crate side down so that the part facing out would be smooth) over my new headboard and cut around it so that my foam would fit over my headboard. Here it is all cut out.
FYI, I used some spray adhesive to glue it down.

For the next layer I needed batting, which I found at my local craft store for $9.99.  There are more expensive options for batting, but I didn't feel the need to get too fancy.  Plus I was interested to see how inexpensively I could accomplish a decent headboard. 


Unfortunately my staple gun did not have enough power to drive staples into the OSB, so I had to buy some upholstery tacks (super cheap) and just nail them in.  Since the back of the board will not show, I wasn't concerned with making it pretty.  

After the batting came the fabric.  

I learned that cutting little tabs helped smooth the fabric around the curves easier:

(mostly) Finished product:

The bed is still on the floor, but you get the idea. Light switch problem solved!  Once we get our bed frame in (Lee is building it), we can then actually attach the headboard to make it a permanent fixture.  So keep in mind it will be higher up on the wall when the project is complete.  I'll post pictures when it's done!

Price Breakdown:
Sheet of OSB: $11.99
Foam: $25
Batting: $9.99
Fabric: $30.00 (half-price sale going on at Jo-Ann Fabric)
Upholstery Tacks: $2.45
Total: $79.43ish

I thought that seemed like a great price to end up with a decent headboard, and I realized how right I was when I opened up my latest Pottery Barn catalog that came in the mail last week:

There is this headboard  for $899.

 or

This one for $699

Don't get me wrong, I have no doubt the pottery barn headboards are far better quality, but to have a similar headboard for $80 seems like a steal.

ps. I got the idea here.  She has a great list of materials and a detailed how-to!

Friday, July 20, 2012

Dill With It

I love when one thing kind of leads you to another thing.  And then that thing makes you smile and think something else.  And somehow it all just fits together and makes you happy.  This post is not really in regard to the house, but it does have to do with the whole "DIY" theme we have going on.  I'm talking about Homemade Dill Pickles. 

My niece Maggie and I have been talking about making pickles together for 2 years.  It started when I lived at the condo, and then I thought "Hey we can wait until we move into the house and use cucumbers from our garden!" which she got really excited about.  Except there was a slight snag in the plan...we don't have a garden (yet).  So we decided to just head to the grocery to buy some pickling cucumbers and get this pickle party show on the road.


 We ended up making 4 jars of sun pickles. (Really, you leave them in the sun for a couple of days, then refrigerate and eat!)

 And 1 jar of refrigerator pickles.  Because, you know, the only thing better than making one kind of homemade pickles is making two kinds!

So fast forward a day, and I see this:

Which for some reason makes me smile like a fool!  I don't know if it's because this whole pickle party just went down, or if it's because it reminds me of this video from SNL.

Either way...HAPPY FRIDAY!!!!!

ps.  If your kids, nieces, nephews, or even YOU like pickles, you should click on one of the recipes above and try it out!  It was fun doing the shopping, having a couple days of anticipation not knowing what they will taste like, and then having the big reveal.

Review of the Sun Pickles:  Maggie loved them, I believe her words were "we aced it!".  Sydney might have loved them even more than Maggie.  And Reese scrunched up her nose and said "not very good".  As for my review...well, they were much better than I expected, but I couldn't finish a whole one.  They were pretty strong!   I'll let you know about the Refrigerator Pickles once they are ready to try!


Thursday, July 19, 2012

Tension leads to faking it...

Let me clarify.  Tension rods lead to faking roman shades.

Have you ever searched for a food recipe and after reading all of the ingredients and the step by step instructions you think to yourself "this ain't happening"?  That's how I was with roman shades.  I wanted them for our bedroom, but wasn't sure how to make it happen because:

1)  Real roman shades are expensive
2)  Making real roman shades takes skill and patience.

When you don't feel like practicing your skill or your patience, you can fake it with this wonderful option below.  I have to give credit to Pinterest, who led me to this this tutorial.

Here's how it went for me...

First, I bought a window panel from Target.  $17 buckaroos, I'll take it. 

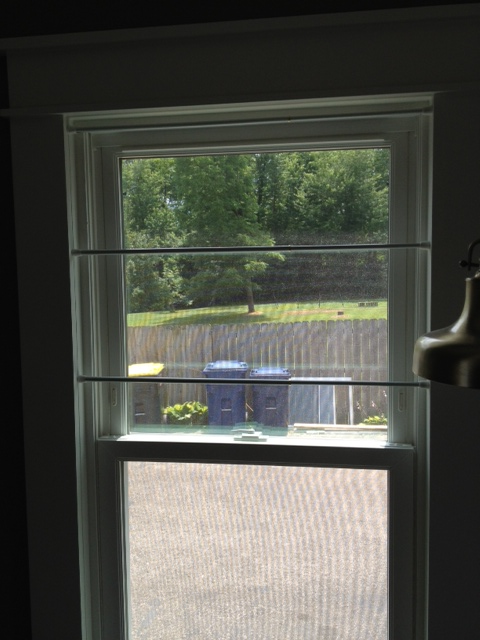
Then, I measured the inside of the windows I wanted to make the roman shades for (these 2 windows on either side of our bed):


  If I remember correctly, they measured somewhere around 26.5"x52".  So I cut the panel in half longways, and it was just wide enough that I could make both roman shades out of the one panel - sweet!  Once cut in half, two of the sides were still in-tact, which meant I only had to sew two edges (the bottom and the side). 


(If you ever attempt this, keep in mind when you cut your fabric to cut it a little long and a little wide so that once you fold and sew your seams you are at your proper measurements.  Since my measurements were 26.5"x52" I cut the fabric at about 27.5"x53" so that I would have about an inch of wiggle-room for my seams).
So I measured and marked:

Drew my line:

Folded along my pencil line and ironed:

Got out my pins:

Pinned and sewed my seam:

Ta-da!

Bottom seam sewed:
 

I then repeated the steps from above and marked, ironed and sewed the side seam:

Finished product:

Here's where the "fake" part comes in.  The next supply I needed was 3 tension rods! The easy-peasyness of this is going to blow your mind.  

I placed the 3 tension rods in my window frame (I played with the distance of them a bit to achieve the look/length I was going for):

Then removed the top rod, slid it through my the top seam of my shade and draped the rest of the shade behind the other two tension rods.

I pulled the fabric up and over the second rod:

Then did the same thing with the 3rd rod, in the end achieving this look:

And there you have it!  They aren't the real thing, but they easily achieve the look.  Plus, if you wanted the privacy you could always let them down to hang in front of the tension rods and you would just see fabric covering your window.  Luckily, those windows lead out to the driveway on the side of our house, followed by a privacy fence, followed by fields, so we have no problem leaving them just like that all the time.  It's nice to know we can just slide them off the rods if we do need to cover up those windows, though.


Wednesday, July 18, 2012

Naps, Good Food, and Netflix

Notice anything different?  I haven't done much on here in the last couple of months, but I did manage to change some colors around. 

And we've got some new wording going on!

We ain't no 2 year old married couple no more.  Psh. 2 years...that's old news.  3 years is where it's at!  Time flies when your having fun working on a big project.  Just kidding, it was kind of fun...sometimes...

3 year old couple.  101 year old house.  Can't wait to watch both of those numbers grow.  Wonder how long I will keep this blog to keep watching it creep up?  Hmm...

I haven't really known what to post lately since we haven't been working on many projects.  So instead of thinking about what to post next, I decided to just take naps.  Sometimes I nap on the couch, sometimes in my bed (do 3 hour naps count as naps?  Or is that into a whole different category?).  Other times I prefer the hammock...that is if Lee will share.

And if I'm not napping, I'm either cooking, or baking, or watching something on Netflix (Vampire Diaries, anyone?).   Wait, I can't leave out my Bachelorette addiction.  We even have a viewing party every week...Team Jef with one f!

Now that we've gotten a few weeks to ourselves, I'm itching to do something.  Good news for me...we have plenty to do.

1) The condo.  It looks like a bomb went off over there.  Since we had the luxury of moving at our own speed, we just kind of took what we wanted/needed at the moment, and left the rest. The result ain't pretty.  Out of sight out of mind is great...until it's not. Time to get moving with that, clean it up, and put it up for sale.  Anyone in the market for a cute one bedroom with an open floor plan, a pool and a park?!  Just let me know ;)

2) Remember the trim?  The trim that I LOATHED.  That I hated for every grueling minute of the cutting, sanding, priming, cutting some more, putting it up, caulking it and painting it? We still have a little more to do. **banging.head.on.desk.over.and.over**  We need to just get it over with or else it will never get done. 

3) My built-ins! For over a year I have had the vision in my head of what I want for my dining room.  It's perfect.  I'm in love.  And it's still not done.  So that will be coming soon!  It's the last big piece of the puzzle for the main part of our house, which is extremely exciting.  Hopefully there will be a blog post about that one coming very soon!

4) More built-ins, but for our bedroom closets.  I will take a picture soon of what our bedroom is looking like these days. It's pitiful, but one day will be better.

I have done a couple small projects lately, so maybe between those small projects and some bigger ones coming up I will have some inspiration to keep posting!


Tuesday, May 15, 2012

These days...

Life.   Is.   Good.  For those that don't know, we finally made the move!  We are about 16 days in and loving every moment.

What a difference it makes having one space that is clean (for the most part) and put together (for the most part) rather than two spaces that are not clean and not put together. 

What was looking like this (don't judge!): 


Is now looking like this: 


Quite the difference on our daily lives, let me tell you.  The best way I can describe it is going from working 2 full time jobs back down to 1.  Extreme, drastic, life altering difference (I promise I'm not trying to be dramatic, it's just really that dramatic of a change).  And somehow we have already entertained 7 times in the 16 days we have been living here.  It feels reaaaaal good to have a nice space of our own to spread out in. There are still plenty of projects to do, but also plenty of time to do them on whatever schedule we want to do them on...which is a crazy good feeling!  The pressure is off, and it feels pretty darn nice.

Next post will be pictures of what the inside is looking like these days.  Stay tuned!